RV Creation Tutorial
Work in progress:
Feel free to ask us if something is unclear or write us to point out errors.
You can contribute by writing missing parts of the tutorial. These can either be posted on the forum you can make a pull request on GitLab.
You can read what needs to be done on the following page.
This tutorial is about creating content for Re-Volt in Blender.
TODO
Tracks
- texture baking
- NCP (needs to be expanded)
- Explain polygon properties
- Mirrors
MakeItGood
- Objects
- Camera Nodes
- Visiboxes
- Instances
- Lights
Cars
There is no tutorial for cars yet.
Tools
Introduction
The following tutorials will mainly focus on open-source software for numerous reasons. The software we are going to be using is free, faster, smaller and, in terms of creating content for Re-Volt, easier to use if you’re just starting.
Blender - 3D Modeling
- Install Blender from here. Be sure to get the 2.79 series.
- Download the Re-Volt add-on from here. Get the latest release.
GIMP - Texture Creation
We will use GIMP for creating textures for the track. If you tried to use GIMP before and didn’t like it, don’t worry. You will see that it suits our needs perfectly. Everything you could want to do with it will be explained in a later step.
Audacity
This is an option. If you are planning to have some sounds in your track or a custom engine sound for your car, you might want to download this audio editor to get your sound files right.
Re-Volt
The tutorials focuses on creating tracks for RVGL. Get the game here.
That's it for now. You are pretty much covered. What you should have now:
- Blender and the add-on
- GIMP
- Audacity (if you want to edit sounds)
- A clean installation of Re-Volt
Blender: Setup
To install the add-on, follow the guide here and come back when you're done.
When you have done that, close the preferences window. Then, with the cursor over the main viewport (with the cube inside of it), press A to select all objects.
The selected objects will be outlined. Press Delete or X to delete these objects (since we don't need them right now).
You can now resize the left sidebar of the 3D view. It contains the main RV tool panel at the very top.
When all that is done, press CTRL U to save the startup file (so you don't have to activate the plugin every time you start Blender).
Now Blender is set up for creating content for Re-Volt.
Tracks
Planning a Track
Introduction
The most important thing is to not overestimate yourself and the capabilities of the game. Re-Volt has been around for more than a decade. You won’t get any amazing next-gen graphics out of it and some mechanics are just not possible. Back then, proper texturing and lighting (manually, of course!) did the job.
Collecting Ideas
Planning the track is probably the most demanding task. Take your time and think for a few days about possible themes and details. Always carry a small notebook to write your thoughts down (nowadays you can do that with your smartphone, of course). Write everything down immediately as it comes to your mind; Anything that could be helpful for your track. Even the smallest detail might help you in the end. You might think that you will remember later but you won’t. No matter how small your idea is, just write it down!
The next step is to find reference pictures and google for some hours. Try different search terms for your track theme. You should also check out sites like deviantArt or Flickr. Create a folder on your desktop and save everything in there. Here are my references for the track I will be making throughout this guide:
If you think you got a solid idea, think about it once more. Do you have every inch of the track planned out? Do you think they could work in the game? It is really important to have a rock solid plan for your track. It will make modeling it much easier.
Some people might be able to just start modeling without much planning, making up parts of the track as they go.
If you're planning to do an indoor track, you can check out Google Maps. There is a list of indoor maps that you can check out to gather some inspiration.
Planning the Track
Categorize your ideas. Some examples are: Track flow, special elements (such as escalators, long jumps, underwater parts, …) and details. Write them down in a table with columns reaching from fundamental elements to little graphical details. This table will help you building up the actual plan. When you’re done collecting your ideas, try to organize them in an order. A fun idea is to cut all of them out and put them on a table, then arrange them in an interesting order.
The Flow
A very fundamental part of it is the flow itself. The flow describes the path the cars take on a track and how well it's driveable. It can be smooth with a lot of curves and aids that help you to keep in line or rather rough with some edges and obstacles. A good flow is not necessarily smooth. Some people might enjoy a little challenge.
Venice is a pretty hard track for beginners but offers a fun challenge for online races. You're easily pushed into the canals if you don't pay attention. The narrow bridge part integrates well into the track theme which makes up for its difficutly.
Just don’t put any unnecessary obstacles in your track (any narrow parts that are just there to make the track harder), but implement obstacles in your overall theme of the track. A hull breach in a space ship that sucks you out into space? That sounds cool. A random spot in the track where you’re just lifted up into the air? Way more likely to be annoying.
The perfect flow is actually up to personal preference. A good example however are stock tracks since most people enjoy them. Ask yourself: What do I like about tracks? What do I hate about them? What do I hate although it’s a funny challenge and worth implementing?
If you mess up the flow, there is little reason for people to play your track. Re-Volt is not a game for showing off your graphics (although some quite nice things can be done). I advise you to not rush or skip this part and do the flow on the fly. Take your time and optimize it where you can. Make your track original and interestingly challenging.
Planning the Layout
Can you suggest any tool for planning a track? Pen and Paper. It’s still the most efficient way to put your ideas down. Take a look at your list of track elements and put them together. Make sure to distribute them all over the track. You should avoid any entirely boring parts. Think about Holiday Camp here. It has that long part where you’re just heading back to the start line. It’s not too bad but it gets boring over time.
If you have trouble finding a proper layout for your track, just have a look at stock tracks from above (You can search for maps on Re-Volt Frontend for some track renderings). It’s no shame to copy some elements from them.
When you have an acceptable flow, start finding places for your special track elements and details. Don’t be vague about this. It will help you immensely if you have a proper map on paper that you could already race on. Don’t leave anything out!
Before proceeding you should have a nice plan of your track. Take your time and rework it a few times. It saves a lot of work to have an accurate map. If you have one, it’s going to be easy to model your track!
Here are some old maps of my first track:

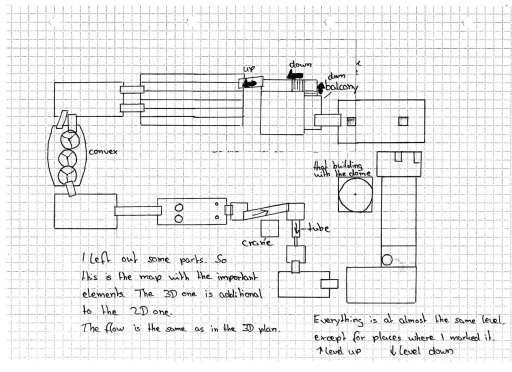
For this tutorial, I'm going to use this one:

The more detailed your plan is, the easier it will be to model the track.
Resources
To create a track, you will need some resources.
Textures, sounds and even models if you don't want to model everything yourself.
Everything
http://opengameart.org/ – Speaks for itself.
Textures
RVIO Texture Animations
More than 20 texture animations ready to be used with the Blender add-on.
RVIO Skyboxes
More than 20 skyboxes ready to be used in RVGL.
http://cgtextures.com/ – Huge resource.
Sounds
http://freesound.org/ – Free sounds. Find login data at http://bugmenot.com
Music
TODO: Find a resource
Useful Topics
Setup
On Windows, some problems with file permissions might occur if your Re-Volt folder is in the Program Files folder (
C:\Program Files\Acclaim Entertainment\Re-Volt\). Sometimes it is better to move your Re-Volt folder to your Desktop or your user folder.
Folder
Create a new folder within ...\Re-Volt\levels with the name of your track (keep it lowercase and rather short). In our example, we'll call it testtrack.
An example for the full path:
C:\Program Files\Acclaim Entertainment\Re-Volt\levels\testtrack or C:\Users\YourName\Desktop\Re-Volt\levels\testtrack
Examples for track names are track_name, track_name01, track1name, ...
It's best to use lowercase letters, underscores and letters.
Blender
Open Blender and save the empty Blender file with CTRL S to the directory that you created for the track. Call it according to your project, for example testtrack.blend.
.inf File
The .inf file defines parameters for the game so it can see and read the track. Feel free to copy the file below and use it as a template. If you want to disable certain features (like MUSIC), put a semicolon in front of it (this will deactivate the line). Create an empty text file in your track folder and rename it to your track folder name, e.g. testtrack.inf. You will be prompted if you really want to rename it. Click yes.
Copy the following file and customize it to fit your track (you can leave most of the things as they are right now).
TODO: Sample track.inf
;--------------------------
;Revolt .INF file structure
;--------------------------

NAME                   'Test Track'                   	  ;The name of the level as seen in-game
STARTPOS               0 0 0                              ;Start position of the car (x, y, z)
STARTPOSREV            0 0 0                              ;Start position of the car in reverse mode
STARTROT               0                                  ;Start rotation of the car (0 - 1)
STARTROTREV            0                                  ;Start rotation of the car in reverse mode (0 - 1)
FARCLIP                34000                              ;Far clipping distance (draw distance)
FOGSTART               33000                              ;Fog start (slightly less than FARCLIP)
FOGCOLOR               0 0 0                              ;Fog and background color (RGB)
VERTFOGSTART           0                                  ;Vertical fog start (as in rooftops)
VERTFOGEND             0                                  ;Vertical fog end (as in rooftops)
WORLDRGBPER            100                                ;RGB percent of original world gouraud (0 is dark)
MODELRGBPER            100                                ;RGB percent of original model (cars, etc.) gouraud
INSTANCERGBPER         80                                 ;RGB percent of original instance (decorations, etc.) gouraud
MIRRORS                0 0.75 0 256                       ;Type - mix - intensity start - distance
MUSIC                  'levels\testtrack\testtrack.mp3'   ;supported formats are mp3, ogg and wav
REDBOOK                4 9                                ;Redbook soundtrack if redbook folder is present. Two values, first and last track.
ENVROLL                'levels\testtrack\envroll.bmp'     ;Reflection on cars
ENVSTILL               'levels\testtrack\envstill.bmp'    ;Reflection on stationary objects and the ball bearing weapon
SHADOWBOX              -96                                ;Changes the contrast/brightness or the shadows on the track, default -96.
ROCK                   0 0 0 0                            ;Rocking effect like on Toytanic.
Check the RVGL Documentation for more options.
So far, we:
- installed Blender
- installed the addon and activated it
- created a level folder for our track
- saved an empty .blend file
- created an .inf file so the track gets recognized by the game
Zip-Snapshot 01
If you're unsure, you can download my level folder:
Track Files
Let’s take a look at garden1’s folder structure. You won’t have to do anything in this step. This is just so you know what a track looks like.

You will find these file types in many tracks:
reversed folder
This folder includes files that will be used in case the player chooses to race it backwards.
<trackname><letter>.bmp
There can be 10 bitmaps, named gardena.bmp to gardenj.bmp in this case.
<trackname><letter>.bmq
You will have noticed that there are similar files to the bitmaps we were just looking at. These are called mipmaps. They are used by the game and will be used on object that is further away in order to make the textures look smoother. Modern game engines do this automatically, and, in fact, if you are planning to make the track just for RVGL, you don’t need to worry about those.
<trackname>.cam
This file contains camera nodes that Re-Volt uses for the replay.
<trackname>.pan
This file contains the POS nodes.
<trackname>.fan
This file contains the AI nodes.
<trackname>.fin
This contains information about instances (decorative objects).
<trackname>.fld
A file for force fields. These can alter the gravity or provide wind effects.
<trackname>.fob
Object file for pickups and other interactive objects.
<trackname>.lit
This contains the lights. Some extra lighting effects can be achieved like shadows on cars and objects.
<trackname>.rim
This one contains simple geometry to tell the game where mirrors are. These are used for reflective floors.
<trackname>.inf
Information file for tracks. It contains, for example, the start position, music path, fog color, etc.
<trackname>.taz
Track zones, used to determine if a car went through all parts of the track.
<trackname>.tri
Triggers: These are used for the direction arrows and repositioning of the car.
<trackname>.vis
Visiboxes are used for performance optimization: Hiding parts of the tracks that cannot be seen anyway based on where the car is. These are optional but can improve performance.
<trackname>.w
The 3D model of the track. We will create this one with Blender.
<trackname>.ncp
Collision and surface data. Also done with Blender.
properties.txt
A text file that contains track properties like materials and effects (optional). You can read about its options in the RVGL Documentation
In the game’s folder, there is a folder called gfx. We will need to put a bitmap in there later which will be used to show a preview picture in the track selection. It will be named like the track folder you have chosen. We will create this file and all the others listed above in the following steps.
First Steps with Blender
- Watch Tutorials first
- Creating objects and moving the camera
- Move, Rotate and Manipulate Objects
- Conclusion
Watch Tutorials first
Blender can get extremely complex if you're not used to similar programs. I highly recommend watching this tutorial if you've never seen Blender or worked with it before:
https://cgcookie.com/lesson/first-steps-with-blender/
It's like a sports car, many people will bin it on their first tries, but if you take the time to learn to drive it's a blast.
- Gotolei
Creating objects and moving the camera
Start Blender and load your level file. First you should get used to Blender's viewport controls. For this, it is wise to create an object to focus on, first. I can't tell you everything here so you will need to use your intuition a bit. Blender has a very steep learning curve. I recommend looking up some basic Blender tutorials if you're having trouble with this step.
Getting some things clear: (You don't need to understand this right away, use it as a reference at a later point)
- Blender can be used to create 3D objects. This space has 3 axes: X, Y and Z. For us, the positive Z axis is up, the positive X axis is right and the positive Y axis is forward.
- We are going to create objects. These objects have a point of origin (center) which can be represented by a position vector (x, y, z), e.g. with (3, 5, 0).
- All objects are made of multiple triangles (polygons). In our case, each polygon will have 3 or 4 vertices (corner points). Most of our polygons will be quads (quadratic polygons with four vertices/points). Note that quads are also made of two triangles. If you have a quad that is non-planar (not flat), you will need to split it into two triangles (more about this later).
You can see a red-white circle in the view port: It's the 3D cursor. This is where new objects will be created. To center it, press SHIFT + C. To add an object, press SHIFT A and select Plane. A new plane object should show up:

Try out the following keys:
I will be using some abbreviations:
LMB: Left mouse button
RMB: Right mouse button
MMB: Middle mouse button
| Keyboard | Action |
|---|---|
| LMB | Set cursor |
| CTRL + LMB and then drag | Lasso selection |
| SHIFT + B | Square selection |
| RMB | Select object. Selected objects will be outlined in orange |
| Numpad Period | Focus on selected object |
| MMB | Pan around focused object |
| Scroll | Scoll in and out, direction depends on your selected object |
| SHIFT + MMB and drag around | Drag around the view |
There are many more hotkeys and key combinations. However, for the basics, it's well enough.
Move, Rotate and Manipulate Objects
One object is not enough. Often it's wise to split your track into multiple parts, or you just want to create an object that is not fixed to the main road. For this, you can either create new objects or duplicate your existing ones. Try out the following actions:
| Keyboard | Action |
|---|---|
| SHIFT + A | Open add menu |
| SHIFT + D | Create duplicate of an object |
| ALT + D | Create duplicate of an object (Geometry will be shared. If you edit one object, the duplicates will change, too.) |
| SHIFT + RMB | Select multiple objects (main selection bright orange, all other objects dark orange) |
| DELETE or X | Delete an object |
| S | Scale an object |
| G | Grab and move an object |
| R | Rotate an object |
Advanced manipulation
Now you can move, rotate and scale objects. You can also do all of these actions along a specific axis. For example, if you wish to scale an object only in height, press S and after that, press Z. This way you can select the axis. If you only want want to scale it on the X and Y axis, press S and then SHIFT + the axis you don't want. Then move your mouse and click the LMB or ENTER to confirm, or ESC to dismiss the tool.
You can also specify by how much you want to scale/rotate/translate. After initiating scale and selecting your axis, type a number (blender units or degrees, depending on what you're doing.) A 90 deg. rotation around the Z axis would be S -> Z -> 90. Moving your object up by 3 blender units (BU) would be G -> Z -> 3.
Conclusion
Now you should know how to create objects and move them around. These objects will contain the geometry of your track. You could create one object for the base geometry and then many small objects for decoration and things that will be represented more than once.
These basics will also help you in the next step in which we will take a look at the Edit Mode. This mode allows you to change the geometry of objects.
Edit Mode
In this step we will take a look at Blender's Edit Mode. You will be able to edit the objects that you created in the last step. We will actually start modeling our track now.
Modeling requires a lot of practice and you will need to find your own workflow. The only thing I can do here is to show you one way of modeling basic things. The main point of the tutorial is to show you how to use Blender in conjuction with Re-Volt. There are many modeling tutorials out there. I recommend watching some basic tutorials on YouTube first. If you trust your intuition, you can also go ahead and read this page, it's not too hard if you've used some other rather complex programs.
Getting your Map inside Blender
You surely want to model along your map that you created.
Go to the Blender Preferences and enable the Import Images as Planes plugin (Go back here if you forgot how to enable plugins. You don't need to install it, only activate it, since it comes with Blender).

Now go to File -> Import -> Images as Planes and select your map.
This will give you a plane, you should not be able to see the texture. To fix this, enable Textured Solid in the right sidebar (you can toggle the right sidebar with N and the left one with T):

Now it is time to scale the map up. We can change the scale later but it is important to have it somewhat right. To do that, select the map with the Right mouse button so it's outlined in orange (as in the screenshot above). Then press S on the keyboard and move your mouse. Apply with ENTER, discard with ESC. (You can also use the mouse buttons to confirm or dismiss changes when scaling.)
For my track, this seems alright (compare it with the grid):

Advanced Tip: Import a stock track and compare it to your plan. Go to File -> Import -> Re-Volt and choose a track that is roughly the size of your track. The select your map object and scale/rotate it accordingly. If you are satisfied, select your map object and press CTRL I to invert your selection. This way you will have the imported stock track selected which you can now delete with DELETE.
Now move the map so that your desired start/finish line is centered on the main grid (I have already done that on the last screenshot). The positive Y-axis (green arrow) is the forward direction. The screenshot above shows an example. This way we don't need to specify the starting position in the .inf file (don't worry, you'll be able to adjust this at any point of time).
Editing an Object
Set your cursor to a part of your track you want to work on (click on your map to move the cursor there) and add a Plane. Feel free to focus on your newly created object with NUMPAD PERIOD.
Now press TAB to enter Edit Mode.
Here I'll show you some of the basic techniques that you can use to model your track geometry. There are many ways of doing this, so feel free to try out what works for you (as long as you stick to the rules further down this page).
Vertex Select
You will see the objects vertices now. Blender defaults to vertex mode by default. Select a vertex and move it around. It works just like the Object mode covered in the previous step. Now select two vertices and try to scale them. You will see that the center of scaling is the median point of the two vertices (the middle). Now select a third one and rotate them. If you're feeling comfortable with that, move on to the next mode. If not, keep experimenting.
Edge Select
Switching modes is easy. There is a bar of three buttons located at the bottom of the viewport:
 Click the center button to enable edge select. Just like with the vertex selection mode, you can now select edges of your object (two vertices at once, so to speak).
Face Select
You can also select entire faces (the area contained by vertices and edges). It is the third button located on the same bar.
With these selections, you can perform the same actions as with the objects. You can scale, rotate, translate, duplicate, ... Now there are some more tools to edit the geometry of objects. I will list the most important ones below and explain how they are used:
Select Linked
To select everything that is linked, i.e. all that belongs to a mesh, press CTRL + L. This is handy if you have a lot of geometry in one object. You can then move, delete or do other things with the selection.
Add
You can still add an mesh to the object you're currently editing: SHIFT + A. It's just like in the object mode.

Subdivide
Press W and then S to subdivide your selection.

Extrude
Select a vertex, edge or face and press E. New geometry will pop out along the normal axis of the selected thing. If you don't want to move it, press ESC or RMB. It will still be extruded. but you will be able to move it yourself. If you want to undo, press CTRL Z as usual.

Make a Face/Edge
To fill in a face or edge from selected vertices or edges, press F

Loop Cut and Slide
Press CTRL + R and then scroll to adjust the number of cuts. LMB to confirm. Then you will be able to move the cut. Move and confirm with ENTER or LMB, alternatively press ESC or RMB to not move the cut.

Merge
You can merge two vertices by selecting them and pressing ALT + M. Alternatively, you can also select them and scale them to 0. Then you'd need to remove double vertices by pressing SPACE and searching for Remove Doubles.
Cut
Sometimes it's necessary to cut some polygons to get a more quadratic shape out of them so mapping a texture onto them will be easier later. An example can be seen here where I cut some triangles into the mesh to connect the two rooms with a door and a threshold. In Edit Mode, press K and then click on parts of the mesh you want to cut. Confirm with ENTER. In the example below, I'm creating the green lines by cutting there. (You can watch this technique on YouTube)

Straighten
If you have a face or an edge that is not straight and you want to level it/bring it to one height, select the vertices in question and scale them to 0 along the Z (or any other) axis. This way, you can align anything you want along a line.
See Geometry through Objects
There is a handy little function that lets you see through objects. You'll be able to select all the polygons, even the ones that would otherwise be hidden by other geometry/objects.

Warnings
Before you actually start editing, you need to keep a few things in mind (Don't be scared. If you get something wrong or don't understand something, you can always get help on the forums.):
- Save often and create backups!
- The more polygons you have, the more it is going to lag in-game. Keep your track under 60,000 polygons.
- Keep the geometry simple! If your track has simple geometry, players will have more fun racing it.
- Keep your quads square! A quad should be 'as big' as the texture you're planning to use with it. You cannot tile textures, you can only tile polygons. Import (File -> Import -> Re-Volt) a stock tracks if you don't understand. You will see that there are many square polygons used for surfaces that largely have the same texture. This is a technical limitation, I will explain it further at a later point. If you have sections with too large polygons, subdivide or cut them so that they fit the textures.
- Learn how to deal with non-planar polygons. Planar quads are easier to work with.
Workflow
If you felt brave and got stuck anyway, you can still watch the following steps on YouTube
I started tracing the track by adding a plane, extruding, rotating, subdividing, ...
 I added one plane, scaled it up and subdivided it. Then I extruded parts and transformed them into the other rooms using the techniques mentioned above.
Creating Parts separately and merging them
Some parts can be modeled as separate meshes and then merged. Here I cut some polygons to fit another part of the track using the knife tool. Then I will merge them with ALT + M:

New parts start as a long plane that can be subdivided or cut:

Combining all the techniques explained above, i copied parts and merged them with other parts. Now most of the track is outlined. It doesn't need to be too clean as we will polish everything in the end. Just make sure that you have no double vertices (remember: remove doubles) and that everything is connected nicely. Everything is flat at the moment (to flatten: select everything and scale Z to 0).

Extrusion and the Magnet Tool
I then started extruding walls and other things from the rooms that I modeled. A very useful tool is the magnet. You can find it in the bottom toolbar of the viewport (in the marked dropdown list, select Vertex):


You can activate the magnet tool by either clicking on the magnet or holding down CTRL. Now you can select a row of edges, extrude it and then move it, point to the vertex you want to snap to, click when it snaps to the right vertex. If not, press ESC and start moving the edges again, this time with your mouse cursor placed somewhere else. You'll get the hang of it. For example, you can get all walls to be the same height with this.
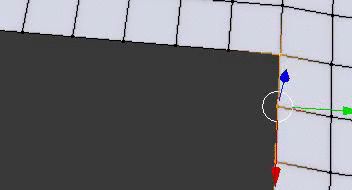
Flip Normals
(invisible polygons, wrong normal direction)
Sometimes it can happen that your polygons are the wrong way around. They are shaded differently:

To make those polygons easier to spot, enable Backface Culling in the right sidebar and polygons will only be visible from their up-side:

To flip a polygon around, select it and use the Flip Direction function in the left sidebar:

Your polygon should now be facing the right direction:

Remember, you can select multiple polygons while holding down SHIFT.
Zip-Snapshot 02
If you're stuck, here is my current level folder:

Dealing with non-planar Polygons
How to spot non-planar faces:
| planar | non-planar |
|---|---|
 |  |
Always pay attention to non-planar polygons (remember, they can be split in two ways). Re-Volt does not like quads that are not straight. If they are non-planar, you will need to split them (if cars will drive on them). The best way to do it is selecting the two opposing vertices and pressing J (this will split quad faces to tris). Here is an example of the ambiguity (Blender might split it the way you don't want):

If you have a large selection of non-planar polygons, for example on a bumpy hill or a lawn, you can select all of them and then press CTRL + T. This will triangulate them automatically.
Placeholders
I am planning to model some parts of the track later, mostly decorational objects. I changed to object mode by pressing TAB and created a few cubes, rotated and scaled them the way I want. Later, I will replace them with proper meshes.
Filling in the placeholders
When you're done modeling a solid base for the cars to drive on, you can start filling in more detailed objects. You can just place new objects (Shift + A, make sure that you are in Object mode by pressing TAB and checking the bottom bar of the view port). Then you can get rid of the placeholder objects. All those objects can be separate, they'll all be exported to the track file. It's recommended to keep the base in one object, though. It's best to have one solid mesh for the cars to drive on.

Zip-Snapshot 03
If you're stuck, here is my current level folder:
Conclusion
At the end of this step you should have a mesh of your track (mostly done, you can polish it later, of course). If you're doing this for the first time: Take your time, start over if you don't like your results. It's a steep learning curve that is tackled easiest in small bits. It also helps to import some simple models from the game and then remodel them. See how you can improve your workflow. Feel free to use google or ask on the forums if you are stuck! There are lots of ways to do things.
The next step is to texture the track. If you have come this far, congratulations! There is still a long way to go but I am sure you learned a lot.
Creating Textures
- File Formats
- Mip Maps
- Rules and Tips
- Gathering Textures
- Gimp
- Creating new Files
- Scaling Layers
- Duplicating Layers
- Merging Layers
- Altering Colors
- Drop Shadows
- Save
- Working with Selections
- Zip-Snapshot 04
- Exporting Textures
- More Textures
- Conclusion
In this step, we will create textures for the track.
First, some theory.
File Formats
Re-Volt uses 10 texture pages with a naming scheme of track*.bmp where * is a letter ranging from a to j (ten of them).
The .bmp textures should have a size of 256x256. Depending on the version of Re-Volt, the resolution can be higher. Beginning with Re-Volt 1.2, you can use larger texture sizes. Check the wiki to find out which sizes and formats are available. If you're going for a high resolution, you should stick to 1024 or 2048 since larger texture might have a negative impact on the track's performance.
Mip Maps
For my example track I will be using 512x512 texture pages. During development, I will name them artsa.bmp, artsb.bmp, ..., artsj.bmp. I will need to rename them to *.bmo later since *.bmp should be used for 256x256 textures:
-------- Size ------------ File --------
      8192 x 8192   -   texture.bmk  (near)
      4096 x 4096   -   texture.bml
      2048 x 2048   -   texture.bmm
      1024 x 1024   -   texture.bmn
       512 x 512    -   texture.bmo
     [ 256 x 256    -   texture.bmp ]
       128 x 128    -   texture.bmq
        64 x 64     -   texture.bmr
        32 x 32     -   texture.bms
        16 x 16     -   texture.bmt
         8 x 8      -   texture.bmu
         4 x 4      -   texture.bmv
         2 x 2      -   texture.bmw
         1 x 1      -   texture.bmx   (far)
You may have noticed the *.bmq files in the Re-Volt levels. They have a size of 128x128. What are they for? Those smaller textures are called mip maps. They will be used for objects that are further away from you. This way your track will look a lot smoother. You can also go into the other direction and use larger versions of your textures for objects that are near. That's what I'm doing. However, it is wise to start work with the largest resolution you're intending to use.
I chose to work with a base resolution of 512x512 pixels. That means that I will have three files per texture page:
.bmo,.bmp,.bmq..
Creating those mipmaps is one of the last steps. While working on the track, I will use 512x512 files called*.bmp.
Also, you can save your textures as .png and rename them to .bmp, RVGL will read them. That's what I am going to do.
Rules and Tips
Refer to them later, you might not understand them yet if you're new to 3D modeling. Re-Volt is a pretty old game. So here are some things to keep in mind:
- UV coordinates must be between 0 and 1 for both axes. This means that you cannot tile textures (as explained earlier in the tutorial). If you map them out of bounds, they will glitch out.
- Pure black RBG(0, 0, 0) will be transparent (if you use the default settings and 16bit bitmaps)
- There are no normal/specular or other special maps. All your details need to be on the texture page. You may also want to include detailed shadows in the textures.
- Brightness of the level can be manipulated with vertex paint. If your level is set at night, you don't necessarily need to use dark textures.
Gathering Textures
A few pages earlier I linked you some texture resources. Download textures you like and extract them to a folder in your working directory. We will use them to compose our texture pages. These are some of the ones I chose. We'll also create some textures from scratch or get some new ones if we need more.

Gimp
If you're completely unfamiliar with programs like GIMP, you can watch a part of this tutorial on YouTube.
The first step is to enable the Single-Window Mode (it's much more convenient). To do so, open the Window menu from the menu bar and select Single-Window Mode.
Creating new Files
Create a new file by pressing CTRL N. You'll be greeted with this:

Set the resolution to 512x512 (or any power of 2 above 256) and confirm.
Scaling Layers
Now you can just trag a texture from your ressources folder into the program.
You can zoom in and out using the scroll wheel while holding down CTRL.
The first thing I want to do is scale it down to take up only a quarter (256x256) of the texture. Click on the scale tool and then on the layer. A window will pop up.

After that you'll want to move it into a corner of our texture. Use the Move tool and grab the layer. It might be outside the canvas (still highlighted by the black-yellow outline). Just move it the top left edge so it aligns with the canvas' edges.

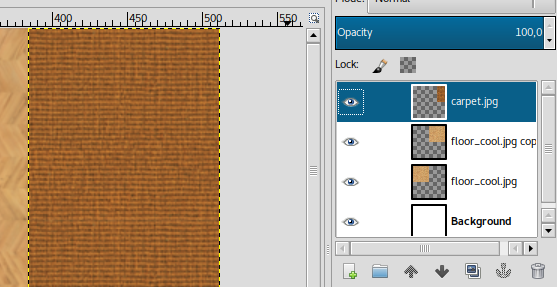
Duplicating Layers
So that is one part of the texture page. I also want a carpet on it, so I'll duplicate the current layer since I need to put the carpet on it. To duplicate a layer, right click it in the right side bar and click on Duplicate Layer.

Merging Layers
Now I dragged the carpet texture into GIMP and scaled it down to 128x128 to only take up a quarter of the wooden floor (as described above). I then duplicated it again and put it beneath it another time to have a larger strip. Then, select the topmost carpet layer from the list, right-click it and select Merge Down. We'll then have a larger carpet layer.
Altering Colors
Now, I have to admit, the carpet is a bit ugly. Select the layer and go to Colors -> Hue/Saturation. Adjust the Hue slider until you found something you like.

Drop Shadows
It still looks a bit bland, I know. How about a subtle shadow under the carpet? Go to Filters -> Light -> Drop Shadow and adjust it to your liking.
| Drop Shadow Window | Result |
|---|---|
 |  |
Save
It's time to save. Hit CTRL S and save it as tracknamea.xcf, I'll save it as artsa.xcf. We'll export to PNG/BMP later.
Working with Selections
The shadow goes a bit beyond the wood part of the texture. I want to get rid of the shadow that sticks into the white part. Select the layer and activate the selection tool. Then select the part that's not on the wood and press DELETE. To unselect, press CTRL SHIFT A.
| Shadow goes too far | Selection Tool | Result |
|---|---|---|
 |  |  |
Zip-Snapshot 04
If you're stuck, here is my current level folder:
Exporting Textures
I added a few more textures to the texture page and it's now full. To export it, press CTRL SHIFT E and export it as a PNG file.

! To make the game recognize the texture, you need to rename the .png file to .bmp. (It's still a .png file, it just has the name of a .bmp file). artsa.png --> artsa.bmp

More Textures
One texture page won't be enough. While modeling the track further, I made some textures for the walls (artsb.bmp and artsc.bmp). Check out how I made them on YouTube. (This video will be referenced in the next step again, so don't be shocked if you see some Blender things that you don't understand yet.)

Conclusion
You don't need to create all texture pages right now. I actually created only the first one and moved on to mapping and modeling the track a bit more. I made some walls higher and did some more adjustments. You can always come back to earlier steps later. In fact, we will create more sophisticated textures in a later step again (Creating Textures (Advanced)). In the next step, we'll put the texture we just made onto the 3D objects we modeled.
Mapping Textures in Blender
You can watch this part on YouTube.
The textures you import into Blender have to be the correct format already:
Height and width of each texture has to be a power of two, as mentioned earlier. Make sure that your filenames are right (e.g. tracknamea.bmp, tracknameb.bmp, ...).
Let's import the first bitmap into Blender. In my case it is artsa.bmp.
You need to have Textured Solid shading enabled, if you didn't already activate it in the Edit Mode part.
Loading and assigning Textures
To apply textures to 3D models for use with Re-Volt you need to paint them on. You do not need to create materials for a texture.
First you need to open the UV/Image Editor:

In the UV/Image Editor, load a new texture by clicking on Open. Select your bitmap file. If you loaded a bitmap before, you can select it from the dropdown list next to it. Don't open files twice (you'll get filenames with .001 endings and those will not export to Re-Volt.
Select the object you want to map and go into edit mode. Now select one or multiple faces you want to apply the texture to.
To select all faces that are on one level, select one face of the ground and press SHIFT G, then select co-planar. It will select the whole floor if it's on one level.

Now you need to map/unwrap the polygons. Move your mouse back to the 3D viewport and press U (with the faces selected that you want to unwrap). For now, choose Reset. You will see that there are multiple quads (all layed over another) in the UV/Image Editor. You can select them just like things from the 3D viewport. They represent your 3D object in a 2D texture space, so to say. For example, you can select all of them and scale them down, then move them to the part of the texture you'd like them be at.

Navigating the UV Image Editor
Some basic and advanced tips.
- Drag the view aroung with the Middle Mouse Button
- Zoom with the Scroll Wheel
- Press HOME to reset the zoom level
- Make sure your mouse is inside the Image Editor when working with it
- When in Edit Mode, you can export the UV map. Select everything with A and then click UVs -> Export UV Layout. You can then use it as a base for your textures.
Manipulating the UV Map
Using Reset
Before you start mapping, please enable Constrain to Image Bounds as it's technically required by Re-Volt. This will make sure that all mapping coordinates stay inside the texture.

Now that we have loaded the texture, it's time to map the faces we assigned the texture to. Just press A while your mouse is in the Image Editor. You will see that you can select those 2D faces just like the 3D ones in the view port. In this case, I need to scale them down by half by typing S 0.5. Then I just move them to the top left corner of the texture by pressing G and using the mouse to move them.

I also scaled it down a bit again so that there are small margins to the other parts of the texture and the borders of the texture. This is to ensure that no other parts of the texture will bleed through when the game filters/smoothens the textures.
It's not perfect yet. You might have noticed that this only worked for (almost) perfectly square faces/polygons. I also don't want the entire floor to be wood. First, I'll take care of the other floor types. To do this, I again selected the faces I want to map another floor texture to. (Optional/Possible: Press U and R again and scale it down to the desired size.)

Then, in the Image Editor, press G to move the UV of the polygons you selected to another part of the texture.
Remember, you can move, rotate and scale the UV as you were able to in the Edit and Object mode. You can also mirror by scaling by -1 (e.g. type S X -1 to mirror horizontally).
The result should look similar to this:

To view the entire UV map, select the entire object in the 3D view port
Summarizing my workflow for large areas:
- select all similar faces (roughly same shape, supposed to have the same texture)
- load and apply the texture sheet to them
- unwrap them using Reset
- select all faces in the UV/Image Editor and move them to the appropriate place on the texture sheet
For more complex objects it would be better to actually unwrap (choose something other than Reset) them.
Zip-Snapshot 05
If you're stuck, here is my current level folder: Download Zip File
Using Unwrap
Sometimes you'll need to map larger chunks of faces onto one texture region. To do so, select all the faces you'd like to map, press U and select Unwrap. This will map all selected faces in one go, mostly proportionate. In some cases, you'll have to rotate the mapping and scale it the way you want it. I used a combination of this and Project from View (explained in the next step) to unwrap the walls.

YouTube: Modeling and Texturing a Tree
With these techniques, I was able to map the floor and the walls.

Using Project from View
Sometimes it's really useful to map the geometry's shape as it is in the view port directly to the texture. This works best with polygons that are aligned to the global axes (X, Y, Z). You can align the camera using the numbers on the numblock or by holding down ALT while panning the viewport with the middle mouse button. Then press U and choose Project from View (...Bounds will span the mapped part over your whole texture). Whenever you can't align the view to the faces, you can always use Unwrap instead.

YouTube: Creating textures for the walls and mapping them with various techniques
Creating Textures (Advanced)
Under Construction Here I'm planning to explain how to
- make textures seamless,
- bake textures using Blender
- compose textures with light
Making Textures Seamless
You might have noticed that some textures do not tile very well. There are seams all over the edges.

Here I selected the layer I want to make seamless:

To make it seamless, go to Filters -> Map -> Make Seamless. The result should look like this:

Vertex Paint
In this step, I'm planning to explain how to add lighting to your track as well as sharp shadows using the knife tool.
Automatic Shading
An easier one-click function is now included in the Blender add-on. See here for instructions.
Here I will show you how to automatically bake the lighting from Blender onto the vertex color channels of the objects so your level doesn't look so flat in-game.
This is how you're seeing your objects in Blender. There is some shading applied to it and you can distinguish some edges. The sides also have different shades.

Now, if you export it and view it in the game, it will normally end up looking like this (white since there's no texture assigned at the moment):
Let's add some lights to your track. Press SHIFT A and select a light source. Then rotate it as you would do with other objects. In the Properties panel on the right, you'll be able to set brightness and light color. I set it up like this:

You will need to add a Color Channel to the objects you want to shade. To do so, select your object by right clicking and then head over to the Object Data panel and search for the list of Vertex Colors. Click on the little plus and a channel will be added.

Before applying the shading to your object, you'll have to adjust some settings in the Render tab of the Properties panel. Turn Textures off.

All that's left to do is bake the light onto that channel (you have to do that once per object). Enable Bake to Vertex Color, make sure Full Render is set as the Bake Mode and then hit the Bake button. To preview, set the 3D viewport to Texture mode.

In texture mode and in-game, your object will now be shaded:

You can change the way things are lighted by adding multiple light sources, setting them up in different directions, with different brightnesses and colors.
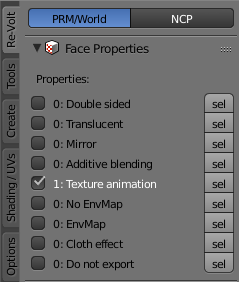
Polygon Properties
Each polygon (face) can have multiple properties. In Edit Mode, the panel for face properties can be found in the Re-Volt tab of the tools panel on the left side of the 3D view.
User Interface

While a face is selected, the checkboxes and the numbers next to them represent its current state.
If the checkbox is checked, all selected faces have this property enabled.
If the checkbox is not checked but the number next to it is not 0, some of the selected faces have the property enabled.
Here's an example: All of the 16 selected faces are double-sided but only 4 have texture animation enabled:

To select/deselect all faces with a property, click on the sel botton next to the propery in question.
Property Explanations
Double Sided
The polygon is visible from both sides in-game.
Translucent
When enabled, the polygon will be rendered transparent according to the Alpha vertex color channel or the transparency of the texture (e.g. PNG or 32bit Bitmap).
Mirror
todo
Additive blending
Renders the polygon with additive blending: Colors of the polygon will be added to the underlying color values.
Texture Animation
Enables texture animation for the polygon. The texture animation slot is determined by the texture set on the polygon:
- If texturea.bmp is mapped to the polygon, slot 0 will be used.
- If texturec.bmp is mapped to the polygon, slot 2 will be used.
This means you are limited to the same number of animation slots as the maximum number of texture pages, which is 64.
No EnvMap
Only used in PRM files. PRMs have env enabled by default. Setting this will disable it.
EnvMap
Mostly used in World files. World files don't have env enabled by default. Setting this will enable it.
As for PRMs, the pickup model (models/pickup.m) uses this to determine the polygons that generate sparks.
Cloth Effect
Enables the cloth effect, used on the Mystery car.
Do not export
A custom flag not used by Re-Volt. Faces with this property enabled won't be exported.
Creating Texture Animations in Blender
- Introduction
- The Texture Animation Panel
- Setting up a Texture Animation
- Applying Animation to a Face
- Texture Design Considerations
Introduction
Objects in a world file can have their textures animated. This guide takes you through the process of creating texture animations and applying them to faces in your world.
You can have any number of texture animations per world file, but the addon is currently limited to 64 slots. Each animation is similar to a gif file or video, which consists of a number of frames. Each frame must be mapped to a region within one of the track textures (eg, tracka.bmp).
Give the Texture Animation reference manual a quick glance and then read on.

The Texture Animation Panel
Texture animations are set up as part of the scene. They are independent of any object or face in your world file. However, you still access them through Blender's Edit Mode because it can be convenient in some cases. You must be careful about this, because selecting a face does not update the face's texture animation slot in the panel!
Select an object in your world file, then hit TAB to enter the Edit Mode. In the Re-Volt panel, you now have access to a new section called Texture Animation (.w). This is where you set up your animations.
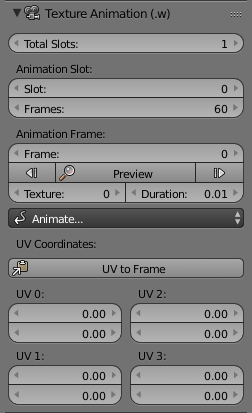
Setting up a Texture Animation
Set Total Slots to the total number of animations you plan on having in your track. Select an animation slot and set the total number of frames for this animation. Under Animation Frame, select Frame 0 and adjust its properties:
- Texture: Texture page number for this frame (0 is tracka.bmp, and so on).
- Duration: Number of seconds to display this frame.
- UV Coordinates: 3 or 4 UV coordinates to define the face mapping for this frame. If you have a face selected, use the UV to Frame button to copy the face's mapping to the frame data. Note that these frame coordinates are shared by all faces that are using this animation slot.
There is a Preview feature, but this is currently broken, because only the UV coordinates are updated. The face is still rendered with its mapped texture, but this is really the texture animation slot and not its actual texture. Read the Applying Animation to a Face section for a better explanation.
You can select further frames and fill in their properties by hand. However, this will not be required for majority of use cases, because the addon can automatically generate two of the most prominent type of animations - Linear and Grid.
Linear Animation
Each frame moves through the texture page from point A to point B (up-down or left-to-right). This gives you a scrolling effect. The Museum 2 elevator should be a familiar example.
Ensure that the first and last frame properties are properly filled in. Then click the Animate... drop down and select Transform Animation.

Fill in the values - set the Start and End frames, the duration of each frame and the texture page to be used, then press OK. This will interpolate between the Start and End frames and fill in the intermediate frame UV coordinates.
Grid Animation
The texture page is treated as an M x N grid. Each frame maps to a successive element / region from this grid. The Mars animation in Museum 2 is an example of this type.
Fill in the first frame properties and set the UV coordinates to the top left corner of the grid texture. From the Animate... drop down, select Grid Animation.
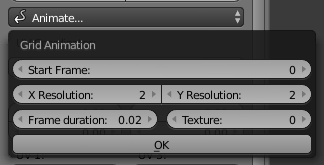
Set the Start frame (typically 0), the duration of each frame and the texture page to be used. Set the X and Y resolution to the number of elements across and down the grid, respectively. As an example, 4 x 4 would give you an animation with 16 frames.
Applying Animation to a Face
This is probably the most confusing part, because faces handle their texture animation information in a rather odd way. This goes way back to some design decisions by Re-Volt's original developers.
A face with Texture Animation enabled does not use its own texture page or UV coordinates. It sources both these information from the animation's current frame. This unused texture mapping information is really used to specify the face's animation slot!
Follow the Texture Mapping guide if you're unsure about how to assign textures to faces. Also learn how to assign Polygon Properties.
To apply Animation #2 to some faces, select these faces and enable the Texture Animation property checkbox from the Face Properties section.
Switch to the UV/Image Editor and assign 2.bmp to these faces (trackc.bmp). Note, again, that the faces are not really going to be mapped to trackc.bmp. They'll be mapped to whatever texture page number was specified in the Frame data for Animation #2.

Texture Design Considerations
When applying animation to a mesh containing multiple faces, it should be noted that the entire animation is repeated across each face. i.e., every face using a certain animation slot is mapped to the exact same UV coordinates within the same texture page.
To give the impression that the faces are animating together, as a whole, care must be taken to ensure that the texture itself tiles seamlessly on all sides. Look for some tutorials on how to create seamless textures in the image editor of your choice.

Tutorial: How To Create A Seamless Texture in GIMP
Collision
The NCP file contains all collision information of your track. Without it you would not be able to drive on it.
It also contains information about the surface itself: Material (dirt, ice, etc.), whether it collides with the camera or not and some other properties.
Collision Mesh
It's generally advised to make a separate mesh for your track's collision. This allows you to be more efficient with the polygon count (since you don't have to care about texture tiling).
Most stock tracks have an NCP file that is a lot simpler than the .w file (the one that contains all geometry and texture information).
Take nhood1 as an example. Import the .w file and then the .ncp file. You can see that the road of the .w file is divided into smaller tiles while the NCP file has longer polygons for the straight parts of the road.
Properties and Materials
Switch to edit mode and click on the NCP tab in the Re-Volt toolbar.

To apply properties and materials, select the polygons in question and set the properties by clicking on the checkboxes and selecting a material from the list. You will see that the polygons change color depending on the material you chose.
In order to see the color preview, make sure Blender is set to solid mode. If textures are assigned to your mesh, you might have a harder time seeing the colors (that's why it's recommended to have a separate clean mesh for your track collision).
You can hover any of these properties in Blender to see an explanation of what they do.
Special Effects
If you want to give your track (or even car) a special look, you can try out one of these things:
Cartoon Style
Cartoons often have outlines around characters and objects. In modern games, this could be achieved with a shader. However, Re-Volt doesn't support such fancy technology. There is a way to get your cartoon fixings despite the games ancient technology.
Please excuse the different Blender theme I'm using, it's much easier to see things with a brighter background! Marv
Alright, first off, here's what we're aiming for:

Before we get started, you might want to set your view port to Texture Mode in order to see vertex colors:

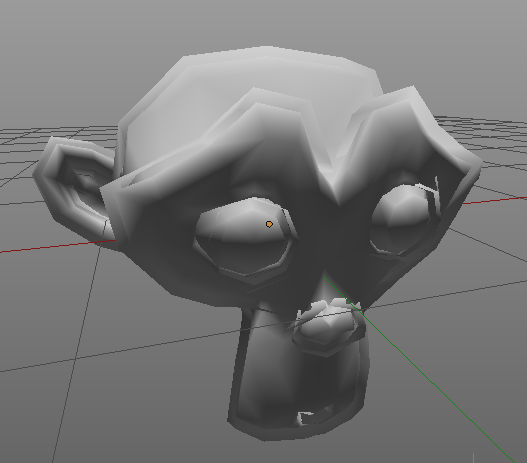
So, you're a bit bored by the appearance of your object, right? Perhaps you're a bit lazy to work out the textures and all you have right now is a shaded monkey.

One thing to note is that results with more complex models may vary, perhaps even require manual cleanup. In this case, it works out alright if you're not a perfectionist (which I know you are!).
To even see what's going on, we need to adjust a setting in the 3D view. Do you remember the panel on the right? You can toggle it by pressing N. Press it a few times to see which panel I'm talking about.
Now scroll down a bit and make sure Backface Culling is enabled.

The first step is to duplicate your object. I'm going to demonstrate this in Object Mode since it's easier to work with.
To duplicate the object, I press SHIFT D. You will then have another instance of the object stuck to your cursor. We don't want to move it anywhere else, so hit ESC or RMB.
If you look at your outliner in the top right, you'll see two of your objects:

Now let's change into Edit Mode. Make sure everything is selected by pressing A. The first thing we'll do is to flip the normals. To do that, either hit SPACE and type Flip Normals or click this button:

You won't see any difference just yet.
Now let's get to the juicy part. Make sure everything is still selected! Press ALT S (this tool is called Shrink Flatten) and move your mouse around. If you're unsure, enter something like -0.1 on the keyboard and press ENTER or LMB. You will already see that something like an outline will form:
Now it is time to assign a color to the outline. Head on over to the Re-Volt tool tab and locate the Vertex Color Panel. You might be prompted to create a vertex color layer. Do so.
When your object has a vertex color layer, you will see the buttons for setting colors. Either pick a color or a shade and press a button (I chose black because I'm boring). You will then see that the outline changes its color:

Enter Object mode again and bewonder your final result. Perhaps go back and change the color or use ALT S again to change the thickness. Yes, I know, there are some rough edges but you have to understand that the game is from 1999, alright?
Now, feel free to merge the two objects by selecting them and pressing CTRL J. You have to do this for exporting cars (.prm), but not when you're working on a track (.w).
Exporting
Your track can now be exported from Blender to the Re-Volt file formats. For now, you will have to focus on the following two:
World (.w): Contains all 3D data
Collision (.ncp): Contains data for collisions
Export
The Re-Volt add-on supports various formats. To export a file to any format, proceed as follows:
Make sure you're in object mode. Click on the Export button in the left toolbar. Alternatively, use File -> Export -> Re-Volt.
The file type will be determined by the file name ending (.e.g. .w).

World (.w)
Export your file as trackname.w into your level folder, where trackname is the name of your track. It needs to match the folder name.
Collision (.ncp)
Export your file as trackname.ncp into your level folder, where trackname is the name of your track. It needs to match the folder name.
Exporting to NCP is a heavy task, it might take up to 5 minutes.
Now it's time to integrate your track into the game. To do so, you will have to use the game's in-game editor.
This is explained in detail in the next section:
MakeItGood
At this point you should be done modeling and texturing your track.
MakeItGood is a cheat code that enables you to access several different editing modes.
To enable the edit modes: Launch Re-Volt in “-dev” mode (revolt.exe -dev). If you are using Re-Volt 1.2 or RVGL (which you should be), this is the way to go.
Alternatively: To get into each of the editing modes select Start Race from the main menu. Then select Single Race, and any game mode. Now put in “MAKEITGOOD” as a name and hit enter. After doing this you should hear a honking sound as it moves on to the car selection screen. Press Esc three times and it should take you back to the Race Type menu. At the bottom you will see a new option, Edit Mode. Select what edit mode you want. Once you get into the level, just follow the tutorial below for whatever mode your editing. You can start with POS Nodes, then continue with Track Zones and so on. Just follow the list of tutorials down below.
| Edit Mode | Description | |
|---|---|---|
 | POS Nodes | POS Nodes tell the Re-Volt engine about the race path, this includes distance your car is from the other cars in the race as well as the length of the track and what it takes to complete a lap on your track. Pos nodes will only define nodes, the orientation is given by Track zones. |
 | Track Zones | Track Zones tell the Re-Volt engine what order the cars need to take around your track to make a complete lap. They work in conjunction with Pos Nodes & AI Nodes.Together with POS Nodes, they’ll determinate your position inside race path. |
 | AI Nodes | AI Nodes are what the ai (computer) cars use to properly navigate the track. AI Nodes are mandatory in all tracks with the exception of battle levels and stunt tracks. |
 | Force Fields | Force Fields push and pull by applying different forces to cars around the track depending on how you set your fields up. You can use these in a variety of ways to enhance the theme of your track. For whatever reason, the word force is spelled Farce in the game. |
 | Objects | Objects are 3D models with special features. This also includes the Pick-Ups which players get their weapons from. |
 | Triggers | Triggers allow you to put direction arrows and other things into your track. This will help people navigate your track. It’s also used for the piano in Toy World and for cameras. |
 | Camera Nodes | Camera Nodes tell the Re-Volt engine where to place the cameras for replays, and what direction (order) they should travel. See TVTIME. |
 | Visiboxes | Visiboxes will block out certain sections of your track while they are not in view, increasing the FPS (Frames Per Second) on your track, making the track a smoother racing experience |
 | Instances | Instances are models that you (or other people) have created that you can insert into your track to enhance your overall theme. |
 | Lights | Adding lights can help create a different mood for your track as well as the objects (such as cars) inside. |
| Portals (Erm, nothing to see here) | Not used in game. This mode was probably used for performance optimization, not teleportation. |
Pos Nodes
What are POS Nodes?
POS Nodes are used to determine your track’s length. The Re-Volt engine will render the Pos node line to use to calculate the distance between cars, thanks to POS nodes the information about other players will get supplied.
Placing POS Nodes (Legacy control)
-
Check your .inf file for the STARTPOS parameter. This parameter will determine the first/last POSNODE. Check this video how to determine this first POSNODE.
-
Type in your game MAKEITGOOD as name, or use the DEV mode in v1.2 and rvgl, more information about this in the AI Nodes tutorial.
-
Go in your track that you want to make POS Nodes. Press F4 then press Insert to insert the first POS Node.
-
Now after you inserted the first POS Node , using the same ‘trick’ insert the second one.
Better use a lot of POS Nodes because sometimes it’s more useful and revolt will give more and better infos. Each POS Node should be very near to the next.
-
OK , you did the first two POS Nodes. Now to do the next step just put the mouse over the first POS Nodes and press Spacebar. Then go with the mouse over the next POS Node and press Spacebar again. You will see a gradient line. This gradient will show you the direction.
-
Continue adding nodes until you covered your whole track.
-
The last step is about connecting the nodes. Hover your mouse over the a node and press Enter. Now hover your mouse over the next node and press Space. Hover your mouse over the third node and press Space again. Keep going till you connected all nodes.
After you have done the POS Nodes press left Ctrl + F4 to save. You will see a small window, you saved the POS Nodes in the *.pan file that you should find in the track’s folder.
Tutorial by miromiro from Re-Volt Live, posted with permission (edited by javildesign)
Modern Editor
If you like to use the new editor you can enable it by editing profiles\rvgl.ini in your RVGL folder.
Open this with your favorite text editor and find these lines:
[Editor]
LegacyCameraControls = 0 // New editor controls enabled
LegacyEditorControls = 0 // New editor enabled
0 is on (new editor), 1 is off (legacy). Restart RVGL completely when you make a change.
Controls for POSNODES using the new editor are listed in the RVGL documentation.
Tutorial POSNODES and STARTPOS

Track Zones
Keymap
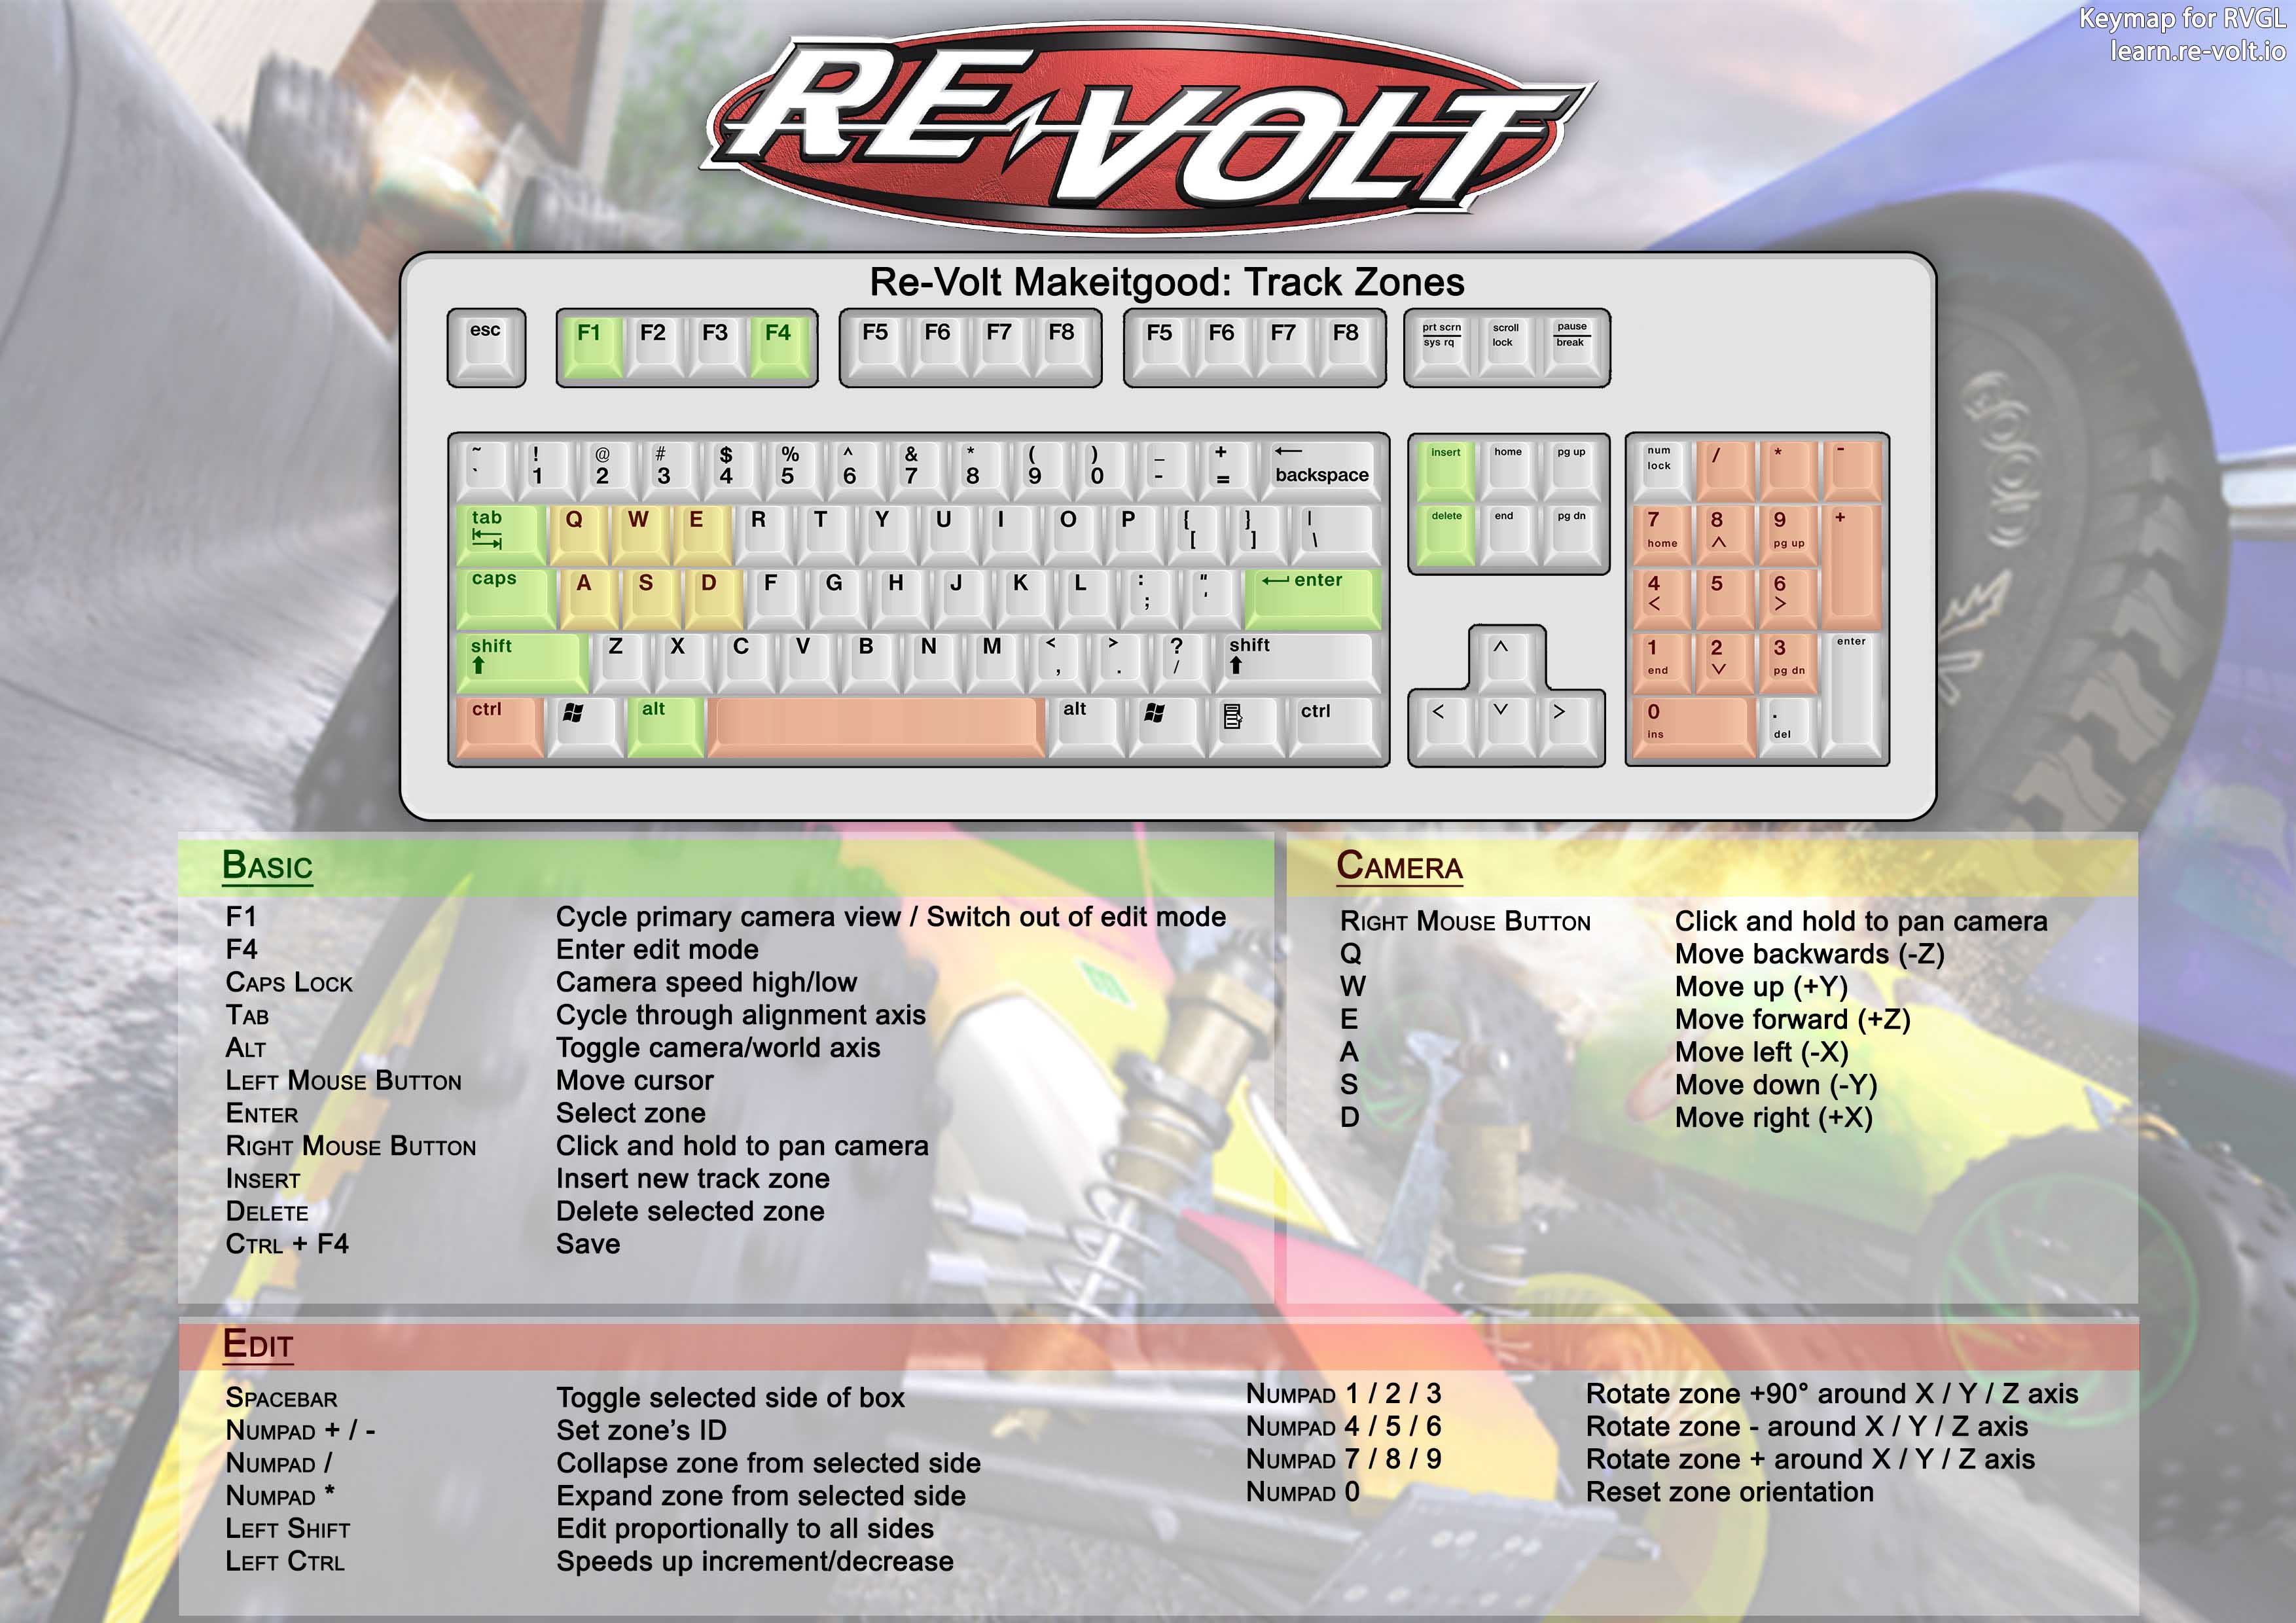
What are Track Zones?
Just like the name hints, track zones are actually zones (boxes) that define which parts of tracks are race-able as well as the racing order.
For this, each track zone has a unique ID which defines the order. Therefore Track zone 0 is the start zone (where all the cars should start from and inside) up to the final track zone whose ID should be number_of_trackzones – 1.

Track Zones in Races
The track zones are actually ‘invisible’ inside a normal race, however, they’re actually present and they define the right orientation and position of the player as well as other cars with the help of POS nodes.

Track Zones in MakeItGood

Just like any other MakeItGood mode, Track zones can be accessed through ‘Edit Mode’ accessible using -dev mode or using MAKEITGOOD as the player name.
Track zone edit mode is one of the easiest mode, in fact, there are not many keys you have to use.
Controls
- Insert: Inserts a new track zone.
- Numpad + and – : Modify the ID of current track zone.
- Moving mouse cursor to a track zone and clicking on Enter: Select a track zone
- Space: toggle the selected track zone’s one of the 6 surfaces (top, right, bottom, left, front, back) for later modification
- Numpad
*and / : Extend or shrink the currently selected surface - Numpad
*and / with CTRL pressed (down) : Extend or Shrink faster - Numpad
*and / with SHIFT pressed (down) : Extend or Shrink all surfaces - Numpad
*and / with SHIFT and CTRL pressed (down) : Extend or Shrink all surfaces faster. - the key labeled 2 (above q,w,e,r) : Toggle seeing other track zones
As well as the classic edit mode controls:
- Numpad 1, 2, 3: 90° rotation along the chosen coordination system
- Numpad 0: restore orientation
- Tab: toggle the chosen coordination system (camera/world)
- Alt: Toggle the axis system (X-Y alone, X-Z alone, X alone etc…)
- F4: Entering edit mode
- CTRL+F4: Saving current work
Tutorial written by Kallel
AI Nodes
To make the CPU cars drive around in a track you will need AI nodes. Without AI nodes you can’t have a proper race against the AI.
- Keymap
- What is AI?
- What exactly are AI nodes?
- 1. How to enter edit mode?
- 2. Making your track ready for AI nodes.
- 3. Inserting the first nodes
- 4. Connecting the nodes
- 5. Reconfiguring the AI Path
- 6. AI Nodes Properties
- A. Racing Line
- B. Pickup Route
- C. Stairs
- D. Bumpy
- E. 25 mph Slow Down
- F. Soft Suspension
- G. Jump Wall
- H. Title Screen Slow down
- I. Turbo Line
- J. Long Pickup Route
- K. Short Cut
- L. Long Cut
- M. Barrel Block
- N. Off Throttle/Petrol Throttle
- O. Wilderness
- P. 15/20/30 MPH Slowdowns
- Extra Things
- Tips and Tricks
Keymap

What is AI?
AI is short for Artificial Intelligence, which means that the computer cars have their own “fake” intelligence. But still, the cars don’t know where to go, and how fast they should go, and when to brake. This is when AI nodes comes in handy. The cars do know how to read the AI node path, which is a part of their intelligence.
What exactly are AI nodes?
AI nodes are nodes in a track, which you can connect to make a complete path. The nodes tell the cars how to drive in that part of the track. With AI nodes you have the exact control over your AI cars, telling them what way to go, let the cars maintain a certain speed, give the cars actions, like: taking the pickup route, using the battery, drive careful under stairs and many more things.
1. How to enter edit mode?
There are two options
- v1.2 of Re-volt or RVGL has a DEV-mode. You can unlock DEV-mode by pressing the following arrows in the start menu: up, right, down, left, up, left, down, right. Now you have unlocked the edit mode.
- You can unlock edit mode by typing MAKEITGOOD in the name wheel. The edit mode is less advanced than the DEV-mode, because DEV-mode unlocks all the cars while being in the mode, unlock all the tracks, give you a few options while editing like pressing F8 for making a screenshot, F9 for statistics and much more. Thus I recommend using the DEV-mode. For this you have to download version 1.2, which you can find on the following website: http://rv12.revoltzone.net..
After unlocking edit mode or DEV mode you go to the race selection screen. Go down the menu and there is a new mode called Edit mode. If you choose this mode you can use the left and right arrow keys to navigate between modes, for example: POS nodes, Objects, Track zones, Triggers, Lights, AI nodes and much more. But the thing we need are AI nodes. For making the the first AI nodes you might want to select Edit mode instead of Single race, so let’s do that.
Why select Edit mode instead of Single race?
In single race you have AI cars. Those AI cars will follow your node path. If your node path is not finished, the game will crash! By choosing Edit mode you can safely create the AI path, before letting the AI cars drive on it, as edit mode is quite the same as the Practice mode, just with a timer. (basically single race with one car.)
 >The AI node edit mode in the race selection menu.
If you have done this, we can advance to the next step, which is making your track ready for AI nodes!
2. Making your track ready for AI nodes.
Before creating AI nodes I suggest to create POS nodes and Track zones first. Also you have to put a definite starting position in your track. This to make things easier for you.
3. Inserting the first nodes
Go to the track you want to edit. To edit you have to press the F4 button, to enter Edit Mode. Your HUD will disappear and a mouse arrow will appear. This mouse arrow is your best friend, with the arrow you can select nodes, navigate through the track (with right mouse button), do a lot of other things.
Important to remember: the Left side is the Green bubble, and in the Right side, put the Red bubble.
Press Insert, to insert your first node at the left side of the track. This will be the place where the green node spawns. Hold your left mouse button and move the red node to the right side of the track.

Placing the first node in AI nodes Edit Mode.
So, you have placed your first node and two bubbles! Now repeat this throughout the whole track. There are a few tricks in making AI nodes.
- At least place a pair of nodes every 3 car lengths.
- Turns will need more nodes, for the better AI intelligence.
- More nodes means better intelligence, the AI will get more information -> can cope better with AI problems, like getting stuck, crashing into walls etc.

Nodes for a normal turn.

Nodes for a sharp 90 degree turn.
As you see in the two pictures above, you will see both ways to place nodes. In a normal turn you don’t have to put as much as in a sharp turn. It is important to have more nodes, as the AI won’t steer well while being in both nodes, it needs new instructions. If there are a lot of nodes, you will see the AI steering much smoother!
If you placed all the nodes, then it should look like this:

Note: Please notice that they are NOT connected and that there is no middle line yet.
As you can notice the ‘bubbles’ are blinking. This is because they are not connected yet. In the next step you will learn how to connect nodes.
4. Connecting the nodes
If you did everything correct, and followed correct the last steps, you will be able to connect the AI Nodes that you inserted.
Put your mouse over the first start node. Press enter to select the node. Hover your mouse over the second node, and press Space. Now hover the mouse over the next node, and press Space again! Now you have connected the first three nodes. By doing so this way, it will look like this:
 >Connecting the first two AI nodes!
Connecting AI nodes has never been so easy!
Continue until you connect all lines correctly.
Note: Check your nodes, so they have green bubbles left, and red bubbles right! This is very important, if this is not the cause your track will crash most likely. BUT! Why don’t the nodes stop blinking? Don’t worry.
You have to save! To save you have to press ‘Left Ctrl + F4‘.After this you will see a pop-up window, telling you “trackname.fan” is saved! Now check the AI Nodes, and you’ll see that they’re not blinking anymore. If they are still blinking then you did something wrong. This happens if you didn’t connect them properly.
After this, go back to the main menu. Now start a single Race in your track, and see those AI cars driving, following your nodes? Good job.
5. Reconfiguring the AI Path
Now you’re going to learn how to reconfigure the AI path.
I suppose your AI nodes kind of look like this after connecting:
 >AI nodes after connecting them!
What is wrong? Well, nothing is wrong! Just the AI path is exactly in the middle of all the nodes. Maybe it could work on some tracks, but not on ones with 90 degree sharp turns, chicanes, etc. To fix this, we need to reconfigure the AI path.
How to do this? We have to use the numpad / and * keys first, to edit the white path. Try it for yourself; Select the first node, press *, and the white line will move to right. Same goes for going left with the / key.
Note: This is only possible with a numpad!
 >AI Nodes after reconfiguring them.
Okay, look at that white line now! Looks much smoother, isn’t it?
There are a few tricks. While editing the white line you have to think about the smoothness of the AI, and let them brake as less as possible, as pretty many cars in Re-Volt doesn’t have the best acceleration.
In the real RC world there is a trick for taking turns, in a real track.
 |  |
|---|---|
| This is the standard trick of taking a corner in a RC car race. | Multiple ways of taking a corner. |
Those pictures are from a real RC manufacturer (tamiya.com), take these pictures in consideration for creating the perfect AI.
The Purple Line
While editing nodes you see a purple line. What the hell is that???
The purple line is the overtaking line, for your AI nodes. If there is a faster car, they can take the overtaking line so they can overtake the slower car, when the slower car gets lapped, or making a collision with your or another car.
After creating your white line, I suggest select the first node, press Shift+Space to delete the purple line. After that you can edit the overtaking line with the numpad keys 8 and 9.
Tricks for using the purple line
With purple line you can do a few nice tricks, see here:

The purple line trick, for the start – the bottom four cars will follow the purple line in this case, thus there will be less start crashes!
The second trick – you can use the purple line to let cars avoid the oil puddles that are commonly placed – a lot of crashes happen there which means you can “overtake” them, and the oil puddle!

Okay, a car placed a oil puddle between two lines. Imagine if there was one line, then the chance for driving over an oil puddle is doubled. The purple line prevented it a few times.
6. AI Nodes Properties
Now that you have the base idea down, it’s time to learn how to give properties to the AI Nodes. To change the properties for the racing line press ‘Numpad Enter‘ and you’ll see that the line changes its color, depends of the property. If you want to move the properties the other way, press ‘Left Shift + Numpad Enter‘ This is one of the most important steps when you create AI for your track.
A. Racing Line
It is the first property you get. If you take a look, after you connected the nodes, you’ll see a white line in the middle. That is called Racing Line. It means, that it doesn’t really have a property. It leaves the AI Cars to drive at their max speed. That’s why in the beginning of the curves you should never use this. This is recommended for the zones where you have enough space to drive faster, you and the AI, like the long straights in Toys in the Hood 1.

The white Race Line property – cars will drive at their maximum speed
B. Pickup Route
This one is always used when you have a track with splitways. The AI takes only one route out of two, then choose for the one they don’t take, the property as Pickup Route. The AI cars that don’t have any weapon ready for use, will take that route to get a weapon from the pickups.
If the car has a weapon ready it will ignore that route. As you can notice the line is now light blue. That means that it’s not a simple white racing line anymore, you only need to assign it one or two times, not for the whole splitway.

Can you see that car that used the route with the Pickup? Can you also notice the blue line? This means that the car doesn’t have any weapon ready.
C. Stairs
This is one of the least used AI properties. It is always used when the AI Cars drive on stairs, the AI will stay carefully on their wheels and maintian balance. The line of this property is grey.

D. Bumpy
The big roaring cars, like Phat Slug, Panga, Bertha Ballistics and Mouse takes that line. It is used for tracks with normal and offroad roads. When you make AI Nodes for the offroad part, choose, like on Pickup Route, Bumpy. I don’t really think it works, but it worked on some tracks. It is like Soft Suspension – another AI Nodes property that we’ll learn soon. The line of this property is a dark brown. Aeon, a good AI Nodes editor says that the Bumpy is:
(Aeon)
Bumpy – or whatever it was called – is a route that is more likely to be chosen by cars which have a high Suspension AI setting.
And he was right!

So, if you have offroad tracks, try to use this property to let the car take a good shortcut.
E. 25 mph Slow Down
It does what it says. It slows down the AI car to 25 mph. If the car drives faster than this, it will slow it down. It is a very good one. You’ll need also Petrol Throttle or Off Throttle… I’ll tell you soon why. The line of this property is yellow.

Do you see the yellow lines? That is the 25 mph slow down property. See also the car? It drives now at 25 mph because it is driving through that node.
F. Soft Suspension
It does again what it says. It is used by the AI Cars that have soft suspension. Here are the stock ones that uses it: Phat Slug, Mouse, Bertha Ballistics, Rotor & Panga. It is represented by a light pink line. It can be used mostly on track with splits or shortcuts.Let me show you a picture with it and how it works.

Can you see that small car? That one is a custom one that has soft suspension. That’s why it chose that line. Also the light brown line is the Soft Suspension. So, now we can advance to the next step!
G. Jump Wall
It is used to “skip” sections in the track, for example in case you have a track with a long jump and a bottomless pit, weak cars most likely won’t make that jump. If you use nodes with that property there and your car crashes in that section, it will be teleported to the next “non-Jump Wall” node (thus helping the cars over the jump).
However even though this property can be extremely helpful in tracks that have such jumps, it should also be used with care as it could be exploited by players in certain situations where the crash could end up being beneficial instead of causing you to loose time (that’s probably why its not used that much). But as long as the nodes are placed properly and the track has been tested well enough, this shouldn’t be an issue.
H. Title Screen Slow down
The name explains it all, it was used in the intro, so the AI cars would drive very slow.
It slows down the car. It slows most of all properties, it slows a car to 5 mph. It isn’t used in any of the stock tracks and not too much at customs. It’s useful for the tracks with small racing line, where the AI crashes in a lot of things.

Do you see the car? It’s going very slow at about 5 mph because the racing line is very small, that’s why there are also AI Nodes walls (we’ll learn soon about it).If you understood what it is, let’s go on!
I. Turbo Line
This one if for telling the AI Cars that it’s a good place for using battery. If the AI car has the battery as the next ready weapon and it drives over a node with this property it’ll use the battery. A tip: don’t place this property along the road ahead. Only at the beginning. If not, it could use the battery only when it finished going through the AI and will be a problem, because a battery-driven AI car is hard to tame with the normal nodes. It is represented by a orangish-red line to suit its action.

Do you see Cougar that uses the battery? Well, this is because it drives over the AI Nodes with Turbo Line property. Also, do you see that it’s low ahead road? No curves? So it has to be. Find the best place for battery use, and use the property there. Every track needs one.If you have questions, I hope you know what you should do, just ask here! And now let’s advance!
J. Long Pickup Route
Like ‘Pickup Route’ this is used to tell the AI Car where to drive to get a pickup if it hasn’t one. It doesn’t work every time on all tracks, but sometimes you can find workable one. The CTR Palm Marsh track used a lot of this. There are 2 routes. One shorter and one longer. On the shorter is no pickup, and on the longer is. So, when you make AI for the longer route, use this property to tell the AI car that there’s a pickup. If not, the AI will ignore that route. The cars that have a weapon already, will ignore that route. The color for this line is dark red.

Do you see the car that uses that line? And it’s also a pickup there that the car just picked up. Also, please notice that that route is longer that the other. That’s why it is called ‘Long Pickup Route’.
K. Short Cut
It tells the car when there’s a shorter way. If you have a track with two routes, where ever you put that property, the car will follow it. Even if you put the Short Cut for the longer route, the AI will drive only on that route, even if it’s longer. The AI cars sometimes take this route for a short cut. Pretty self explanatory. If the car is close to the node it will take that line over the default racing line. Here’s a picture so you can better understand what I mean.

Do you see the cars and the Skid Marks? That means that all the AI cars take that route, even if, how it seems, it’s not the shortest. So, if you want the AI to follow only one route, use this property with the pink line named Short Cut. Let’s skip now to the next property, right? wink.gif
L. Long Cut
The AI cars sometimes take this route if they accidentally drive into it. This may happen because of oil, getting shoved, or just a simple loss of control.

As you can see in the pic above, the AI car on the right lost control and swerved into the Long Cut node. It will follow that until it rejoins with the Racing Line. Moving on.
M. Barrel Block
This property is unknown, and I could not find anywhere in the stock tracks where it is used.
N. Off Throttle/Petrol Throttle
It’s very important! Most of the experienced AI users place these properties before using the slow down properties. It doesn’t let the AI cars to get out of control making an 180 turn, losing time. Let me show you a picture to see where to place it…

The image shows an Petrol Throttle. The Petrol Throttle makes the car repeatedly go off throttle and then back on quickly. The car goes go, off, go, off etc… Depends only of you which one you’d like to use.
O. Wilderness
Not much is known on this property. Urnemanden however has developed a fitting theory that might be true. He says:
(Urnemanden)
I think that the wilderness property was made for the AI to have a backup-line just in case that it came off-road. These backup lines could help the AI avoid all the obstacles on its way back to the racing line, and help it save important time and get further in the race. Of course you just have to set up these backup-lines the most important places. Urnemanden’s theory is very possible and I think it’s correct.He crashed off the normal Racing Line nodes and ended up on the Wilderness nodes.
P. 15/20/30 MPH Slowdowns
They do exactly what the 25 MPH Slowdown does, they slow the car to the desired speed. By using a good combination of them, you can let the car not slide in turns, like for example use a 30 mph property first, then slow down to 20, then to 15 if it’s a sharp turn.
Extra Things
What about the reversed track AI nodes? There is a simple, yet good trick for this. Press Shift+R and Shift+T to reverse your nodes. Same goes for POS nodes, track zones have to be done manually.
Tips and Tricks
String multiple node properties together to get the best AI.
Making decent AI involves simply moving the racing line and making slowdowns. Making great AI involves combining almost every type of node.Use the throttle properties! Sure slowdowns are important too, but if you really want to make good AI you have to use everything. Sometimes slowdowns aren’t the best node for the job. If you have an AI line that has a sharp narrow turn in it, maybe you don’t have enough space to slow the car down, and if you have them suddenly slam the brakes then you might have them crashing into each other. A better alternative would be if you set a Petrol Throttle section a while before the corner, thus slowing the car down more effectively than the wall.
Keep the line level and smooth.
This may sound stupid, however please keep the line on the ground and not in the sky. How can you edit and perfect your AI when the nodes are floating? Also, you should try and keep you line as smooth as possible. You wouldn’t want a car to turn right, and then swerve left randomly. That would just make the AI horrendous.
Create an AI line out of a ghost path
For this one you have to be in the Time trial mode. You need to place the nodes first, but no need to optimize the racing line.
What does this exactly do? Race the best lap you could, preferably without shortcuts, with Toyeca or another car.
Use the key combination ‘6’ + ‘Left Shift’ for applying the ghost path to the racing line, extremely useful if you didn’t work on a racing line yet (the resulting line might require some fine tuning for the AI).
Thanks to Kenny for the explanation of Jump Wall nodes and for the constructive criticism about this tutorial.
Force Fields

In track making the farce field can be used to add to the theme of a track. Acclaim tracks using farce fields include: Ghost Town 1 and 2, Toytanic 1 and 2 and Toys in the Hood 2.
When in the racing environment hit F4 to enter edit mode and then press insert to begin inserting farce fields. RV will automatically select the Linear farce type. Place the mouse over a field name and press enter to select an already present field. When finished adding your fields remember to hit CRTL+F4 to save your changes.
NOTE: All fields (except spherical) have a white line in the center of the field. This line tells RV which direction to push in. I suggest editing the field’s size and placement in camera axis mode and editing the rotation and direction line in the world axis mode (hit left alt to change ). I also recommend changing the direction of the push in Rot Box mode (num pad del to change). The reason for this is because it is easier to get a perpendicular line direction by rotating the box instead of the line. Refer to the keys table for information on how to change all field settings.
LINEAR (red):
The first type (and most common) is the linear field. This field is a pushing field for objects. This field is used on the Toytanic levels in the pool. The two values for the field are Mag and Dampening.
Mag: (press num pad enter to change value when selected)
Tells RV how much force to apply to object entering the field. In the toytanic pool this is used to make lightweight cars float. The accepted value for floating, as if in water, is 2300. All values entered in this spot should be positive numbers.
Dampening: (press num pad enter to change value when selected)
Tells RV how hard the field is. When objects hit the field it determines how far they should be allowed to go in before they are pushed back. Accepted values for this spot are positive numbers between 0 and 100. A value of 100 creates an invisible wall. Any object trying to enter the field while going against the direction of the push will not be allowed to enter. WARNING: Do not place a value of 100 on a field where the object entering the field will be pushed in the same direction of travel, this will create a force powerful enough to throw the car off of the track.
ORIENTATION (green):
The second type of field is the orientation field. This field is used to rotate a car so that it faces a certain direction. This field is used in the Toytanic pool and in the Aqua series of tracks. The mag and dampening values are used in this field, but the Dampening value is not needed for proper use of the field. Note: The white line should point to the bottom of the car or object.

Farce field set to Orientation with magnitude 1000000
VELOCITY (blue):
This field is similar to the Linear field with one small difference. If a linear field is used to push a car when the mag value yields a push smaller than that of the cars top speed the field will act as a speed limiter. The Velocity field does not do this (I think). The velocity field should add to the top speed of the car. The velocity field uses the Mag value to determine its effects.
SPHERICAL (yellow):
It is a round field that has no direction line and has GRAD START and GRAD END as its settings. There are no known uses of this field in any RV track, Acclaim or user made.
WIND (no color):
(only found in Ghost Town)
It is assumed that this field pushes very light weight objects. The use of it in Ghost Town appears to be in the movement of the tumbleweed. How it does this is unknown. The settings for this field are MAG and DAMPENING.
Objects

Triggers
- Keymap
- What are Triggers?
- 1. Controls
- 2. Placing Triggers
- 3. Types of Triggers
- A. Piano
- B. Split
- C. Track dir
- D. CameraRail
- E. AI Home
- F. CameraShorten
- G. Object Thrower
- H. Gap Camera
- I. Reposition Car
Keymap
Currently not available.
What are Triggers?
Triggers are used to activate certain events or manage the player camera. Triggers are not necessary for a track to work, however, it is recommended that you at least add 'Track dir' triggers, so players know what path to take.
1. Controls
- Insert: Insert a new trigger.
- Enter while mouse is on a trigger: Select the trigger.
- Space: Select a face (top, right, bottom, left, front, back) for editing.
- Numpad *: Extend selected face.
- Numpad / : Shrink selected face.
- Hold CTRL: Extend or shrink selected face faster.
- Hold SHIFT: Extend or shrink all surfaces.
- Hold CTRL and SHIFT: Extend or shrink all surfaces faster.
- Numpad + and Numpad -: Change the trigger type.
- -: Decrease 'Flag low' value.
- +: Increase 'Flag low' value.
- {: Increase 'Flag high' value.
- }: Decrease 'Flag high' value.
2. Placing Triggers
- Use 'MAKEITGOOD' as your name or use the 'DEV' mode in v1.2 and rvgl. More information about this in the AI Nodes tutorial.
- Load the track you want to make Triggers for. Press F4, and then press Insert to insert a trigger.
- Look in the top right corner. You can see information about the trigger:
 Here is an explanation for each value:
Piano: The type of trigger that is currently selected. Use Numpad + and Numpad - to change.
Flag low: Used for several purposes. Use - and + to change. Some triggers make this value appear as text instead of a simple number.
Flag high: Only used by some triggers. Use { and } to change.
Here is an explanation for each value:
Piano: The type of trigger that is currently selected. Use Numpad + and Numpad - to change.
Flag low: Used for several purposes. Use - and + to change. Some triggers make this value appear as text instead of a simple number.
Flag high: Only used by some triggers. Use { and } to change.
3. Types of Triggers
The types of triggers and their uses are listed here.
A. Piano

This trigger is used for the piano in Toy World 1. Usage: For this trigger to work, it must cover the full piano area and the cars that drive on it. To use this trigger in a custom track, the piano must also be in the exact same position as it is in Toy World 1. Flag low: Not used? (60 in Toy World 1) Flag high: Not used? (20 in Toy World 1)
B. Split


This trigger is used for Time Trial mode. It displays the split time (how many seconds you are ahead or behind your record). Usage: Place halfway through your track, or divide it into 'segments', placing one at the end of each. Note that crossing the start line will act the same way as touching a Split trigger. Flag low: Used for order. Set to '0' for the first trigger you pass through, '1' for the second, ... Flag high: Not used.
C. Track dir


This trigger is the most important, because it tells players what the racing line is.
Usage: Place before each turn in your track and in sections you think might be confusing (such as two-way paths and intersections).
Flag low: Used for type. Here is a text/image list:
 Flag high: Used for order. Set to '0' for the first trigger you pass through, '1' for the second... You can repeat numbers and use 'Dummy' triggers for multiple-way paths. Examples:


D. CameraRail

This trigger activates Rail cameras. More information is in the Camera Nodes tutorial. Usage: Place this trigger covering the entirety of your Rail camera path. When a car enters it, the camera is activated. When it leaves, it is deactivated. Flag low: The starting camera ID. Flag high: Not used.
E. AI Home


This trigger is not used in stock tracks and rarely used in custom ones. It does not appear to have any effect. It could be related to forcing AI cars back to the racing line. More testing is needed. Usage: Unknown? Flag low: Unknown. Makes a line go around the trigger when the value is '0' through '31'. Attempting to set it to '32' causes it to reset to '0'. In the custom track 'Human Center by human', there are two of these triggers (seen above, first two images). The first one has this value set to '0', the next one has it set to '1'. The motivation for this is unknown, as the value doesn't seem to affect anything. Flag high: Unknown.
F. CameraShorten


This trigger is used to make the camera go closer to the car. Usage: Put in places with low ceilings. Can also be used on ramps, so that the view isn't so terrible. Flag low: Sets how much the camera will be zoomed in (compared to original). Flag high: Not used.
G. Object Thrower

This trigger is used to activate 'Object Thrower' objects. For more information, visit the Objects tutorial. Usage: When a car touches this trigger, the corresponding Object Thrower is activated. Flag low: Set this to the ID of the Object Thrower to be activated. Flag high: Not used.
H. Gap Camera
Usage: Flag low: Flag high:
I. Reposition Car

All cars that touch this trigger will be repositioned, as if the played had pressed their 'Reposition' button. Usage: Place this trigger in an area you do not want the player to access, or where they would probably want to reposition as soon as possible. If you use this to block off access to locations, make sure that the area is clearly marked as 'out of bounds', otherwise, players will be confused. Flag low: Not used. Flag high: Not used.
We do not have a proper, full tutorial written yet. In the meantime, check these out:
- Articles on Re-Volt I/O Archive
- Tutorials on Re-Volt Live (includes outdated content)